
Search the Community
Showing results for tags 'static'.
Found 3 results
-
Have you ever thought that WordPress is slow? Have you ever been suspended for causing high load because of WordPress? Did you think that other CMSs like Joomla and Drupal have an outdated dashboard and/or are overwhelming for beginners? Then look no further. Publii is an AMAZING FREE static site CMS. Static sites can load WAYY faster than sites coded with an admin page (using PHP for example). Faster websites increases SEO, user engagement, and so much more. Unlike other static site generators or the simply static WordPress plugin, you can actually edit and update your site(s) with a simple to use, user friendly admin page (instead of having to manually code your website). It has an easy to use, beginner friendly user interface. Yet with customization features good for people with experience with code. After all this CMS generates static files that you can easily edit through the cPanel interface (or your favorite code editor) if you want more customization. To get started, go to Publii and just download their app. Then install the app on your computer. Done, it is that easy to setup. To create your first website, you need to click on add a new website. When you add a new website it will tell you to choose a name, symbol and author name. Then click add. Before you start anything, I recommend that you choose a theme. To choose a theme, go to this website: Themes and Plugins and download your preferred theme. Then go to the Publii dashboard and click on the three dots on the upper right hand corner. Select themes, click on install themes and select the zip file you downloaded. When you are finished, you can start creating your website. You can create your website in multiple different ways. If you have an existing (or backed up) WordPress installation, you can easily upload the website using the WordPress importer. If not, you can easily create your first post either using a WYSIWYG editor (kind of like the WordPress classic editor), block editor (pretty much identical as the WordPress Gutenberg editor), or Markdown editor (for the tech savvy people to code a page). When you finish writing your posts/pages (they are called the same thing), you can explore and play around with everything since the website hasn't been published yet. For example: tags, menus, authors, theme settings, site settings, backups, custom CSS, custom html, File Manger (not for existing files but to upload a new file), Log viewer, Regenerate Thumbnails, AMP (accelerated mobile pages), WordPress Importer(etc.). Now you just need to connect to a server so your website can be public. You can either choose to publish your website on cPanel or using GitHub Pages, whichever one you choose. To do that, click on Server in the side menu and choose your method of publishing. You can either upload using ftp (here you enter your site URL and ftp server, username, and password), using GitHub Pages, or manually uploading the files (not recommended as you will need to upload a fresh copy every time you edit your website). To publish your changes just click on sync your website and it will automatically upload a fresh copy of your website and rewrite the old copy of your website. Voila, you have just created a FAST and SECURE static site. Pictures of the Dashboard:
-
 Note: This is only one of the many ways to implement caching. This in my opinion the easiest and the one that works for me. This is my method on how to easily Implement Caching Headers in .htcaccess. Now some of you must be wondering. What in the world is caching. Caching is a way to speed up your site by preloading the site so that it can be delivered to you faster. What that means is that instead of doing the complex calculations of generating a website every time, they can just deliver you a saved copy. Kind of like making more products than your customers ordered so when another customer orders the product, you won't have to make it from scratch, you just need to deliver the premade product to them. So with no further due, lets get started. Before we start, here is a Gtmetrix test for my website before implementing these caching headers. Not to shabby, but we can make it better. To implement caching headers you would need to go to the cPanel file manager or connect via ftp. Then you would need to open the .htaccess file. If you don't see one, make sure to go to settings and show hidden files. If you don't have one, you can just create it. Then paste in this code: <IfModule mod_expires.c> ExpiresActive On # Images ExpiresByType image/jpeg "access plus 1 year" ExpiresByType image/gif "access plus 1 year" ExpiresByType image/png "access plus 1 year" ExpiresByType image/webp "access plus 1 year" ExpiresByType image/svg+xml "access plus 1 year" ExpiresByType image/x-icon "access plus 1 year" # Video ExpiresByType video/webm "access plus 1 year" ExpiresByType video/mp4 "access plus 1 year" ExpiresByType video/mpeg "access plus 1 year" # Fonts ExpiresByType font/ttf "access plus 1 year" ExpiresByType font/otf "access plus 1 year" ExpiresByType font/woff "access plus 1 year" ExpiresByType font/woff2 "access plus 1 year" ExpiresByType application/font-woff "access plus 1 year" # CSS, JavaScript ExpiresByType text/css "access plus 1 month" ExpiresByType text/javascript "access plus 1 month" ExpiresByType application/javascript "access plus 1 month" # Others ExpiresByType application/pdf "access plus 1 month" ExpiresByType image/vnd.microsoft.icon "access plus 1 year" </IfModule> Done, it is that easy. Now if you want, you can edit the code to your preference but that is optional. Now take a look at the exact same website after implementing that caching methods. As you can see my website (without any changes) loaded TWICE as fast as before. If your homepage has changed and you want to clear the cache. Just replace the code above with this code: # DISABLE CACHING <IfModule mod_headers.c> Header set Cache-Control "no-cache, no-store, must-revalidate" Header set Pragma "no-cache" Header set Expires 0 </IfModule> <FilesMatch "\.(css|flv|gif|htm|html|ico|jpe|jpeg|jpg|js|mp3|mp4|png|pdf|swf|txt)$"> <IfModule mod_expires.c> ExpiresActive Off </IfModule> <IfModule mod_headers.c> FileETag None Header unset ETag Header unset Pragma Header unset Cache-Control Header unset Last-Modified Header set Pragma "no-cache" Header set Cache-Control "max-age=0, no-cache, no-store, must-revalidate" Header set Expires "Thu, 1 Jan 1970 00:00:00 GMT" </IfModule> </FilesMatch> Save the file and wait a few minutes (5 - 30 minutes). Then just replace the .htaccess file with the original caching code.
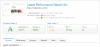

-
I want to use a static file. So I create a static folder under the project folder and put the file under the static folder. And I also added the needed info in settings.py, url.py and the html. But it still doesn't work. Is the something wrong in my files? Or there is something which need the admin's configure? What have been added in settings.py: INSTALLED_APPS = [ 'django.contrib.admin', 'django.contrib.auth', 'django.contrib.contenttypes', 'django.contrib.sessions', 'django.contrib.messages', 'django.contrib.staticfiles', ... ... STATIC_URL = '/static/' STATIC_ROOT = os.path.join(BASE_DIR, 'static_collected') STATICFILES_DIRS = [ os.path.join(BASE_DIR, "static"), ] STATICFILES_FINDERS = ( "django.contrib.staticfiles.finders.FileSystemFinder", "django.contrib.staticfiles.finders.AppDirectoriesFinder" ***************************************************************************** What added in url.py: from django.conf.urls.static import static ************************************************** What added in html: {% load static %} background-image: url("{% static "pyStocks/imgs/background-cloth.png"%}");


